Recording and capturing a drum performance can be a lot more time consuming and challenging than recording guitar amps, due to the fact that a typical drum kit will contain a larger range of frequencies than a guitar. For instance the kick drum will cover the bottom of the frequency range, and the hi-hats and cymbals will be in the top end, on top of that you have the toms and snare somewhere in-between those two ranges.
As a result, recording a drum performance well, ideally needs a variety of different mics, suited for different recording purposes. As with my page on recording guitars I will attempt to cover two important decisions, microphone choice and microphone placement.
Kick Drum – The sound of a kick drum is predominantly a low frequency ‘thud’, usually between 70 and 100Hz, and the attack sound of the beater hitting the drum head, which occupies a higher frequency range, typically anywhere between 2 and 4KHz. (Recording Hacks, 2010) Microphone placement is usually inside the kick drum close to the beater if the producer wants to capture more of the attack sound, (dynamic microphones work best for this, as the high sound pressure levels may sometimes cause distortion or damage condenser microphones), this placement also reduces spill from the other elements of the drum kit. An alternative to this placement is just outside the kick drum to capture a more ‘natural’ sound although the downside to this is more spill from outside sources. (Recording Hacks, 2010). A lot of popular kick drum microphones have frequency boosts in the two frequency areas listed before. For example the popular AKG D112 has a 4dB boost at 100Hz, as well as a 5dB boost at 3KHz (Sound on Sound) The microphone we will be using to record the kick drum also has these characteristics, albeit a much higher boost of 10dB at 60Hz, and a 15dB boost at 5.5KHz. (See fig 1)
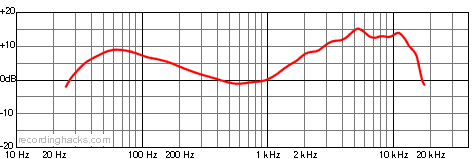 (Audix D6 Frequency Chart – *Fig 1)
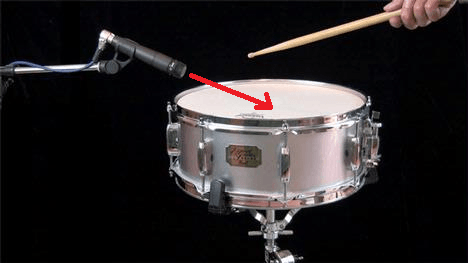
Snare Drum – “Miking the snare drum’s batter head is an almost universal first choice, either with one or two different mics together” (Sound on Sound, 2008) The snare drum microphone of choice for a lot of people is again, the trusty Shure SM57, and just like for recording electric guitars, will often be the first microphone out of the cabinet. This is for a number of reasons, firstly, as a dynamic microphone it can handle even the loudest sounds without distortion. The cardioid polar pattern is helpful at reducing spill from the other parts of the kit, and the 200Hz Bass roll-off helps to reduce spill of the kick drum. The SM57s boost between roughly 3 and 12KHz give the snare sound more ‘snap’ (Sound on Sound, 2008) In terms of placement, whether using one or two microphones, the first usually goes on the top side facing inwards at a slight angle towards the centre of the head (See Fig 2). Some engineers also elect to place a second microphone on the underside of the drum, typically facing towards the metal snares (See Fig 3).
 (*Fig 2)
 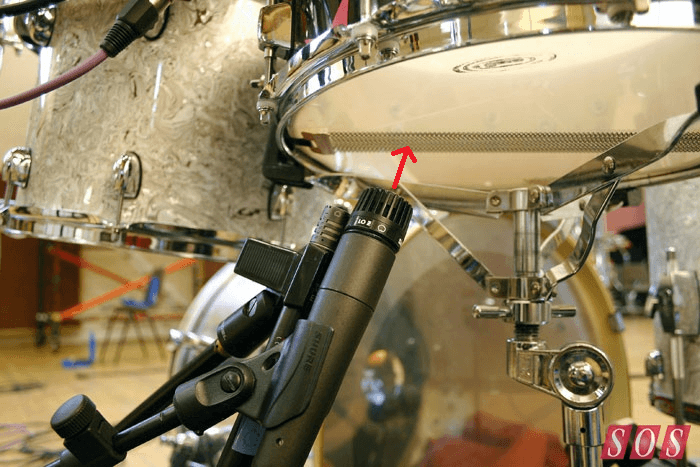 (*Fig 3)
For The Suspicious Pigeons we have elected to use the two-microphone recording process, with one microphone on the top and one underneath. The two microphones we will be using are the Shure SM57 and the Audix i5. The reason for the i5 is that is has similar characteristics to the SM57, a bass roll off and a peak in the highs at roughly 5.5KHz. But it differs in the fact it has a 5dB boost at 150Hz, which we wanted to utilise to achieve more ‘fullness’ in the snare sound. (See Fig 4)
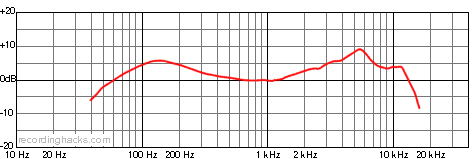 (*Fig 4)
Toms – These elements of the drum kit are often regarded as being not as important when compared to the kick and snare drums, and in some genres, producers will not mic them up at all, but rather let the sound be picked up by the drum overheads (Sound on Sound, 2003). With rock genres however, it is more typical to close-mic these elements of the kick, as they sometimes can get lost if relying on overheads alone. Placement of the microphone generally relies on the same principles as the snare drum, angled towards the centre of the head from above, so as to reduce spill from other parts of the kit. “The tom-toms are best miked up like the snare drum, with dynamic mics positioned just over the rim looking at the centre of the head” (Sound on Sound, 2003) (See Fig 5)
 (*Fig 5)
For recording The Suspicious Pigeons we will be using an Audix D4 to mic the floor tom, and two Audix D2s to mic the rack toms. Both of these microphones have a very similar frequency response, (as seen from Fig 6 and 7), the D4, however is more suited to recording the deeper floor tom, with an extra octave in frequency response (40Hz) (Audix USA) below that of the D2 (68Hz) (Audix USA).
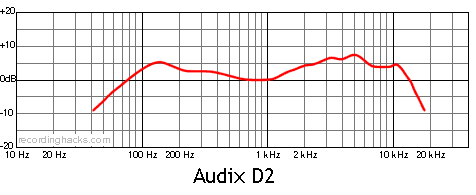 (*Fig 6)
 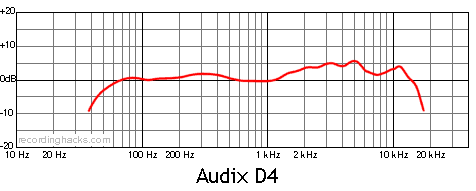 (*Fig 7)
Hi-Hats – Asides from the Kick and Snare, the Hi-Hat is one of the more important components of a drum kit, as it is often crucial in keeping the beat. There is some debate, however, over whether it needs separate miking. “There is almost always enough hi-hat in the overheads and/or snare drum mic” (Sound on Sound, 2003). And “Many times the overhead mics will provide enough response to the high hat to eliminate the need for a separate hi-hat microphone” (Shure) Those producers who want the extra control that miking the hi-hat can bring should be wary of the lessening control that happens with the introduction of each new microphone.
For The Suspicious Pigeons we have elected not to use a separate hi-hat microphone, as we believe we can capture enough of it using the overheads. Because we have close miked the snare, kick and all the toms, it leaves room for the overheads to more closely capture the sound of the cymbals and hi-hats, as well as the overall sound of the drum kit.
Cymbals – In the same way that hi-hats can be captured by the overheads, the same can be said for cymbals, and perhaps even more true, given that cymbals “tend to radiate sound in a bipolar pattern above and below the metal plate” (Sound on Sound, 2003) directly into the path of the overhead microphones. The one downside to this though is that because the Overheads also capture the sound of the whole kit, it gives the producer less control over the individual levels of the cymbals. A technique often employed by some producers and engineers would be to record the cymbals completely separately after the fact, as done on the famous Queens of the Stone Age track, No One Knows, engineered by Eric Valentine. “The advantage of doing this is that it allows a lot more flexibility in how you can mic the drums” (Music Radar, 2014)
Overheads – As the overheads record the sound of the whole kit, as well as the sound coming from both the hi-hat and any cymbals, it is vital that the correct microphones are chosen, and placed well. Most drum kits come with two overhead microphones as standard, as does the one provided by media loans: two ADX51s. It is important to use two of the same microphones in this situation, as using two different microphones can result in an “unstable and ill-defined stereo image” (Sound on Sound, 2006). Further to this, most professionals often elect to use ‘matched pairs’. Matched pairs are microphones of the same type that undergo strict testing to ensure that they both have the same sensitivity and frequency response. They are usually microphones that come from the same ‘revision’. With companies that have stricter tolerances, however, matched pairs can often be less of a benefit, and you then have to weigh up whether the increased cost of buying a matched pair outweighs the sometimes subtle differences in stereo image.
In terms of microphone placement there are two popular choices, these are XY (coincident pair) and spaced pair.
XY, or, coincident pair is where both microphones are placed right next to each other, facing outwards over the top of the kit. (See Fig 8)
AB, or, spaced pair, is where the microphones are ‘spaced’ apart over the top of the drum kit. (See Fig 9)
When deciding which method to use when recording The Suspicious Pigeons, we weighed up the advantages and disadvantages of both techniques. Through research, we determined that XY has a narrower stereo image than AB, but due to both microphones being placed directly next to each other, tracks will collapse to mono very nicely (providing phasing issues aren’t introduced by other microphones elsewhere in the process). AB then, has a wider stereo image, something we felt was important as we want the E.P. to sound ‘big’. On the flipside to XY, AB can introduce phasing issues as the microphones are placed at a distance from each other, sounds from either side of the kit will reach the opposite microphone later than they do the microphone that is closest. To combat this though, it is common to place spaced pair microphones at an equal distance from the snare drum. Doing this “has the added benefit of centering the snare in the stereo image” (Shure, 2011)
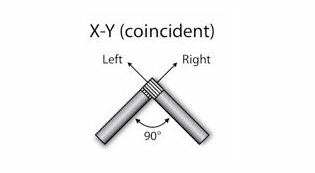 (*Fig 8)
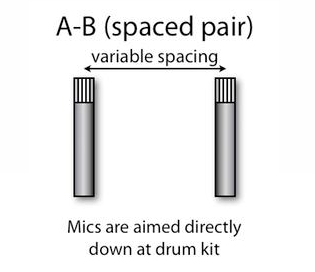 (*Fig 9)